Guides & Tutorials (beta)
Adding Codejock ToolkitPro to Visual Studio 2010
If you are using CodeJock ToolkitPro in Visual Studio 2010 you can observe that it does not add the default Codejock paths to the VC projects because VS 2010 has changed the way controls the default C++ paths.
In previous versions they were locked into options. In this new version they are in a per project basis. Then Codejock installer cannot put them in the right place and when you try to compile a program you get some errors about files not found.
It is very easy to solve this problem and we are going to explain it here.
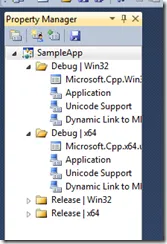
1. Open a C++ project. First thing to do is to open any C++ project with Visual Studio. Does not matter if it is not a Codejock one. Only open it and go to View -> Property Manager and expand "Debug | Win32" and/or "Debug | x64" (or Release equivalent ones):
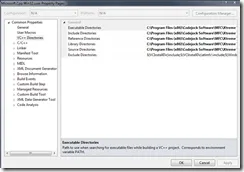
2. Select "Microsoft.Cpp.Win32.user" or "Microsofr.Cpp.x64.user", right click and select "Properties". Point in "VC++ Directories":
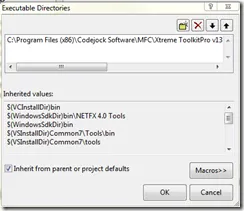
3. Now is time of add the paths. Drop down each element and add a new path:
4. Depending if the project Properties options selected is x86 or x64, path may differ, but not much. Next table explains what paths add in what options relative to Codejock base installation path, that for my last version is (C:\Program Files (x86)\Codejock Software\MFC\Toolkit Pro v13.3.1):
| Win32 (x86 project) | |
| Option | Path |
| Executable | Bin\vc100 |
| Include | Source |
| Reference | Lib\vc100 |
| Library | Lib\vc100 |
| Source | Source |
| Exclude | [none] |
| Win32 (x86 project) | |
| Option | Path |
| Executable | Bin\vc100x64 |
| Include | Source |
| Reference | Lib\vc100x64 |
| Library | Lib\vc100x64 |
| Source | Source |
| Exclude | [none] |
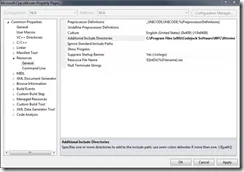
5. A final step is needed after close all. We need to go to "Common Properties -> Resources -> General" and add to "Additional Include Directories" the same path as in Source and in both Win32 and x64:
6. Finally we need to close all and accept when asking about saving inherited user properties on Visual Studio close.
After doing this you do not need to repeat it anymore because the options are saved in XML files stored in C:\Users\<username>\AppData\Local\Microsoft\MSBuild\v4.0 and used by any C++ project.
One final step is needed if you want to run Codejock built software linked in DLL files: add both Win32 and x64 bin paths to global path. It can be done via "Advanced systems Settings" in "Computer Options".
Originally published by Rafael Ontivero geeks.ms, original post can be found here


User Comments
No comments yet, sign in to comment.